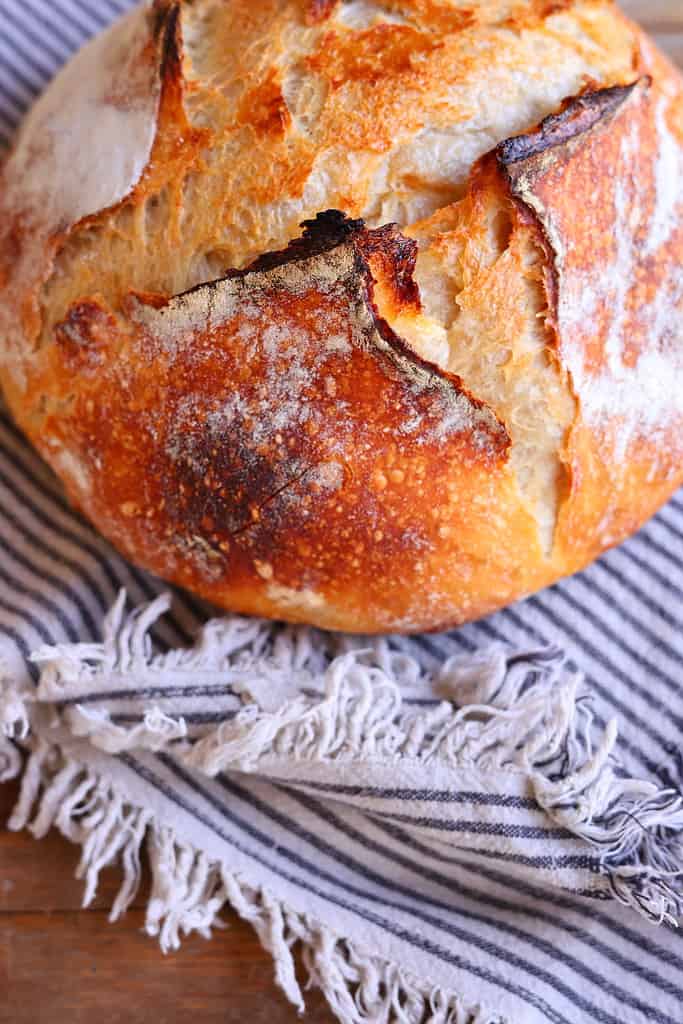
This everyday crusty sourdough bread will quickly become your go-to bread recipe. The high-hydration of the dough gives the bread a chewy, tender crumb with a delicious crunchy exterior. Perfect for serving alongside your favorite rustic dishes!

Don’t Forget To Share This Recipe On Social
What is naturally fermented bread?
Naturally fermented bread refers to bread that uses naturally-occurring yeasts in the bread-making process, instead of the commercial yeast you can buy in the baking aisle of a grocery store.
Watch Healthy Elizabeth On Youtube
The latest on Youtube:
“I have been making sourdough bread for years. There has never been a single recipe that I have followed, that comes out this perfect. This is one of the easiest recipes yielding the best results. Let’s just say, I’m glad it’s a 2 loaf recipe…..my family eats it faster than I can bake it.”
– Jennifer

More Bread Recipes
No posts
Here’s How To Make Naturally Fermented Crusty Sourdough Boule
Don’t forget you can bake along with me in my Step-By-Step Guide on YouTube

My Sourdough Toolkit
- Weck jar for starter: https://amzn.to/3vO8Kle
- White weck jar lids: https://amzn.to/3VKPrEr
- digital kitchen scale: https://amzn.to/4914j5f
- 6 Qt. dough tub: https://amzn.to/48CldXM
- Dough tub lid: https://amzn.to/4242C4L
- spurtle: https://amzn.to/48XvsWx
- bench scraper: https://amzn.to/3vwgw39
- Flour sack towel: https://amzn.to/3S0i7pv
- banneton basket: https://amzn.to/48CPZjx
- unbleached parchment paper sheets: https://amzn.to/4b1IOmA
- 6 qt. Lodge dutch oven: https://amzn.to/47D7ijc
- Kraft Bread Bags: https://amzn.to/48BZP5a
- Nutrimill grain mill: https://shrsl.com/4bgbt
- Organic unbleached flour: https://amzn.to/47DA8Qn
INSTRUCTIONS
I feed my starter with this ratio:
- Sourdough Starter: 45g
- Slightly Warm Water: 150g
- All-purpose Flour: 150g

Everyday Crusty Sourdough Bread.
This everyday crusty sourdough bread will quickly become your go-to bread recipe. The high-hydration of the dough gives the bread a chewy, tender crumb with a delicious crunchy exterior. Perfect for serving alongside your favorite rustic dishes!
Equipment
- digital kitchen scale
- 1 6 Qt. dough tub with lids
- 1 wooden spoon or spurtle optional
- 1 bench scraper optional
- 1 tea towels or banneton basket liners
- 1 banneton baskets
- unbleached parchment paper sheets
- 1 dutch oven
- Paper Bread Bags optional
Ingredients
- 125 grams active sourdough starter, fed, bubbly, and doubled in size (fed 8-12 hours before assembling dough) A typical sourdough feeding for me these days is: 45g sourdough starter, 150g water, 150g water. I like to make enough to always have some discard on hand!
- 500 grams organic, unbleached, all-purpose flour or bread flour
- 12 grams sea salt
- 365 grams filtered water slightly warm
Instructions
Measure the ingredients using a digital scale
- Turn on your digital kitchen scale. Set the dough tub on the scale and press "tare" to make the scale read 0g.
- Add 125g active sourdough starter into the tub. Then press "Tare".The scale should read 0g.
- Next, add 365g slightly warmed water into the tub. Using a wooden spoon or spurtle (or any kitchen until), stir the water and starter until the water is nice and creamy.
- Now add in 500g of all-purpose flour. Shake or scoop a couple cups worth of flour at a time, until you reach 500g.*If you accidentally add too much flour, just scoop as much as you need to off the top.
- Again, press "tare" and make sure your scale reads 0g. Now add 12g salt.
Mix the dough and let it rest
- Remove the dough tub from the scale and place on the countertop. Stir everything together until a shaggy dough has formed. Place the lid on the tub and let it rest for 30 minutes so that the flour can absorb the water.After the 30 minute rest, stir again making sure everything is nicely incorporated and grab the dough and stretch it up and fold it over just a few times.
Bulk Ferment
- Place the lid on the dough tub and place either on the counter for roughly 4-6 hours until doubled in size. (At this point you can also place the dough in the fridge to ferment overnight or roughly 10 hours).*After it sits in the fridge overnight, if it did not double in size, place the dough tub on the counter top for a few hours until it has doubled in size.
After the bulk Ferment
- After the bulk ferment, remove the dough from the tub and place it on a work surface or countertop.*Dough will feel sticky, this is perfectly normal. This is a hydrated dough.
Shape the dough
- Make your hands damp with a small amount of water. Fold the dough over itself. It will begin to change texture as you push and pull the dough a few times on the countertop.Next, fold all the corners to the center, flip the ball over, and push with one hand and pull the dough ball on the counter with the other hand about 4-5 times and then twist it in the circle to help seal up the bottom seams until a round loaf has formed.
- Place a tea towel in your banneton basket.Lightly flour the tea towel, rubbing the flour in with your hands so that the dough will not stick to the tea towel. Grab your bread dough and flip it over into the banneton basket. Sprinkle a little flour over the top of the dough and fold the four corners of the towel over the dough.
- Let the bread rise for 1-2 hours on the countertop, until light and giggly (it will not double in size).
Bake the loaf
- After the 1-2 hour rest, preheat the oven to 450℉. Place a dutch oven in the oven to preheat while the oven is preheating.Lay a sheet of parchment paper on the counter. Turn your dough out of the banneton basket onto the parchment paper.Take a sharp knife and slice a 2-3 inch line on the top of the loaf.
- Once the oven is preheated, remove the dutch oven, take the lid off, place the loaf in the pot, using the parchment paper to pick up the loaf. Place the lid on the pot.Bake for 30 minutes. Then remove the lid and bake for 10-12 more minutes.Once done baking, remove the loaf from the Dutch oven using a spatula, and let the loaf cool on a cooling rack for at least 1 hour (or until fully cooled, preferably) before slicing into it.
THIS recipe turned out so great! Thanks Elizabeth for making it easy. This was the first time that I didn’t get a dense loaf. The oven spring was perfect. The ear…my husband thought it was .impressive! 😊 Wish I could post a pic.
I happened across your master class on YouTube and watched it twice. I had my starter ready to make my current recipe and made your crusty boule recipe instead.
The instructions were great. Baked the bread this morning as loaf instead of boule, and I am amazed at the smell and look of this bread.
This just became my goto recipe.
I have the Sourdough Sandwich bread in the Kitchenaid now and can’t wait to taste it tomorrow.
Thanks for your hard work and sharing!
Thank you for posting this recipe and the accompanying video. I followed your directions (except left the dough to ferment on the counter not in the fridge overnight – I have a cool house) and the bread turned out beautifully. I’m very happy with the way they turned out.
How do I make the starter?
I have been making sourdough bread for years. There has never been a single recipe that I have followed, that comes out this perfect. This is one of the easiest recipes yielding the best results. Let’s just say, I’m glad it’s a 2 loaf recipe…..my family eats it faster than I can bake it.
Your comment just made my day Jennifer! I am so glad it turned out beautifully AND that the family loves it, that just makes the world go round in my book. Your feedback is invaluable to me, so thank you for sharing about it with me and others here too!
I am just starting with my sourdough journey and only have one Dutch oven. Can I cut the recipe in half to just make one loaf or would I just leave the other in the fridge longer?
Yes, halving the recipe should work just fine!
I’m excited to try this recipe as it seems so simple! Can I add seeds to this one also?
Definitely! I hope it turns fantastic for you.
Great post, Do you have a recipe for one loaf only, My kiddos and I are trying to make a sough dough bread with unbleached white flour, We have the sour dough starter ready, We made it two weeks ago and its active, I love the way your video explain everything. Thank you for your help 🙂
I’ve made this twice now. Second time is in oven. The bread had a wonderful taste and looked great. My one problem- My dough is very wet. So wet it absorbs all the flour on the tea towel and then sticks. I don’t want to mess it up by adding a little less water or more flour. What could I be doing wrong? I love this recipe and method so please any suggestions?
Hi! That’s great! If the dough feels too sticky try proofing it for less time. That usually does the trick 🙂
I also use rice flour . It helps from not sticking the dough to the towel
The taste and texture are great, but my dough doesn’t want to rise during the second rest period. What should I do? I considered using a heating pad on low- our house is about 68 degrees. Or increasing the rest time…
My two loaves are in the oven without the lids for the last 10 min or so and they LOOK amazing. But until they’re out and cooled and tested I won’t know 100% if it’s a 5/5…..however, I’m betting on it!
So I had to let this ferment for over48 hours in the fridge because 1) on Saturday I followed your starter amounts using my very active starter but mine is used to a 100% ratio and it took much longer to ferment on the counter for some reason. I refused to give up on it though and on Sunday I proceeded to make the dough, even though I knew my timeline wasn’t going to work because the next day I would be gone from 7:00 a.m. until probably 8:00 pm and would not be able to continue. So after the initial 30 min rest it went into the very cold fridge and remained there for almost 48 hours. I took a chance that it was going to work because that dough was at least doubled and still strong! Now after about 3 hours of cooling, I cut it open and I can honestly say it was beautiful! Crispy crunchy crust, very moist but done interior with nice holes, and it has a wonderful taste. Not sour though, and I thought for sure the extra fermentation would have improved the sourness level at least a little. But I’m happy with two loaves ! Thank you for the recipe
If I have only one Dutch oven how can I keep the dough ready/not over proofing so I can cook one at a time. I would rather do the recipe for 2 loaves to save time
Thank you
Hi there, that’s no problem at all. You can keep one loaf in the banneton basket in the fridge until the other loaf has finished baking. 🙂
Can I get amounts for a single loaf of this recipe please? I just got my starter going. I’m single with only one dutch oven too, lol! One Boule a week is enough for me.
I just halved everything, dough seeks just right. Never mind
Wow!! So glad I found your channel!! I gave up a few years back to start the journey of sourdough (too complicated)but when i saw your video and how easy you make it look I had to try!! Thank you so much for the video, it helped a lot!! My 2 loaves crusty boule were awesome and soooo good. Now I ll have to try the other breads in your video.
I started my bread process at 8 AM and it was complete to sit for 8 to 12 hours by 915. Can I cook it tonight or should I put it in the fridge all that time and wait until tomorrow morning to cook it. My house is kind of warm, so maybe I should put it in the fridge. This is my first attempt so I’m a little nervous.
I would put it in the fridge and bake it in the morning to prevent it from over-fermenting. I do it all the time!
Hi I’m trying your recipe for the first time. I’ve made sourdough boules before but I am so excited to try this way. Looks so easy. Love how easy you make it.
Question…… water measurement in your video states to add 740 grams but the printed recipe says 730grams. I followed your video now my dough is very moist after the 30 minute rest. Any suggestions?
Thank you so much!
Hi! I’m so glad you’re trying it out! It’s a very moist dough which is why you can do so little stetching and folding. 730g of water just makes it a little easier to handle the dough. It will look very wet and pretty flat at first but as you fold it on itself and work it into a ball, it comes together! I have made it a 1000 times and it always works even though it looks too wet at first – I promise! Just make sure to wet your hands a little as you go. Best to you!! Hope it turns out amazing!
-Elizabeth 💚
Hi Elizabeth
I love you easy to understand receipes for bread. They are the best I have found.
Can you tell me where or when you discard? I did not see that part on the video.
Thank you,
Teresa
Elizabeth, your video’s and recipes for the Boule is awesome. First time making Sourdough Bread and it came out amazing! Family loved it! I also made the Sweet Potato Lentil Soup and the Vegetable broth and my family loved that too!
I really like how easy your recipe is to follow and have had good look with it. I put the dough in the frig overnight and bake it first thing in the morning. I have only been successful one time with the bread NOT sticking to the tea towel. It sticks every time. Should I add more flour to the towel? Should I put the it back in the frig for the 1 to 2 hours before turning it out on the parchment paper to score and bake? I usually leave it on the counter for 1 to 1 1/2 hours. Thank you.
Not sure if someone else asked this, but can I freeze one loaf and bake it next week?
Oops, I need to clarify that question….since this makes 2 loafs, can I freeze one dough to bake later?
I see comments that say it makes two loaves but the recipes says one. Did you change the recipe? Thanks in advance!
Hey there, yes I just changed it! Most people said they make 1 loaf so I cut the measurements in half for ease of using the recipe. It’s very easy to double it since nothing changes 🙂
I’ve made this bread twice and it’s so wet after the bulk rise that it’s unmanageable. I tried adding flour but it was a mess and didn’t bake properly. I threw away the second dough without baking it. I make your sandwich loaf at the same time and that turns out perfect. Is 365g of water for 1 loaf correct?
Hi there, oh no! Yes, that is definitely the right amount of water. It could be that it is over-proofing. You could try letting it proof for a shorter amount of time and then refrigerate it before you go to form the loaf. That usually does the trick!
Wow! I was so intimidated by the many sourdough recipes and tutorials I reviewed as a beginner. My brother brought me my first bit of starter a few days ago and he decided to try again after giving up due to the complexity. I stumbled upon your video two nights ago and felt hopeful. Today I had some ti,e and wow! So easy. So forgiving as I made a few oopsies. And so dry delicious. Thank you! I’ve shared your info with my brother so he can follow you too!
I’m new to sourdough & I Loved this recipe. My bread came out perfectly. Is this a recipe I can use as a base to add in inclusions or do you have different recommendations for that?
OH YUMMY Goodness.
This is a miraculous bread. When I put the dough in the oven, I was a bit disappointed – it was wet, not well risen, and I thought “oh well, I can at least make croutons”. Then the MAGIC happened in the oven. When I took the baked bread out, it was ENORMOUS! and YUMMY, and CRUSTY, and AIRY, and everything extraordinary you can imagine.
The recipe is easy to follow, but the dough will be wet! I love the simple directions and will use this recipe going forward as my ‘go-to’ for all sourdoughs. What a gift! Thank you so much, Elizabeth.
My mother made a starter for me so I could keep/feed it and try baking bread. Made my first ever sourdough boule using your recipe (including instructions on what to buy – scale, banneton, etc.) and my very first loaf came out perfect!!! I know it’s a bit of beginner’s luck but also following your recipe was very helpful. I’m officially obsessed. Thanks for sharing your baking skills with us!
If I use Kamut white all purpose flour do I need to change the recipe above? Thank you
Hi Pam, You can make the recipe as is! That is what I do. You can also add a 1/4 cup of water if it feels a little dry.
Hi Elizabeth
I love your you tube videos. I just made your beginners sourdough loaf and it came out great. What would the benefit or difference be in using this recipe instead?
Happy New Year!
Thank you for sharing this recipe! I am excited to try it. Just to clarify, though, the serving size above says 1 loaf, but the ingredients listed are for two loaves?